Active Eurorack Busboard Part 2
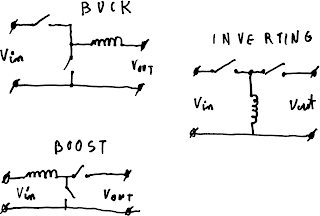
Protection circuitry
Having all parts selected it was a high time to draw schematic. Let's start the discussion with the protection circuitry. All output rails have to be protected against reverse polarity. In case someone shorts positive and negative power rails together one over-current / short-circuit protection will turn converter off before the other one possibly leading to rail reversal. Protection is as simple as putting beefy Schottky diodes normally in reverse polarity on all 3 power rails.
Another possibility is that the user connects 2 busboards together using ribbon and he doesn't connect 24V rail to one of them. In that case converters will be back powered. LMR50410 starts with pre-biased output without any issue but MAX1757* doesn't have clear specifications in this context. To protect it I decided to "create" 24V line from 12V and 5V lines using Schottky diodes from output to input of positive voltage converters, just like you protect linear regulators from load dump. 5V line protection is theoretically redundant but users are unpredictable and maybe they somehow manage to only connect 5V rails together only. Diodes are cheap, modules expensive so why not implement protection even if it'll protect only from very rare errors.
And now the most important yet the simplest protection - short-circuit / over-current protection. It's important because it protects all against blowing something in case of screw falling into case or ribbon ill-connected. Yet it's the simplest because both ICs provide it internally in a very elegant fashion. As these are current-mode converters they inherently measure current and can cycle by cycle limit it. If protection is kicked cycle by cycle and output voltage is falling converters shutdown and then try to power up back periodically checking if short got removed.
Many other failure modes got evaluated and either they're already solved by those 5 diodes or they aren't simple to protect from.
One example of such is an IC failure. it's not impossible that MOSFET inside SMPS IC will fail due to high stresses it has to carry. MOSFET can die in 2 main ways: open circuit and short circuit. If it dies as an open circuit there isn't much issue and simply output voltage will drop to 0V. On the other hand, if it dies as a short circuit, the output will rise to 24V. That'll probably kill all modules powered from that rail.
Signal distribution
As this board is quite big (over 2 dm^2) and the price is an important factor I was forced to stick with to 2 layer PCB. Eurorack uses power ground as reference voltage so any common resistance in ground connection for modules results in direct and unwanted coupling. Considering that board is to be daisy-chained it's crucial to keep ground resistance to minimum I allocated almost entire bottom layer to ground leaving me with just top layer to route 3 converters to headers. This turned out to be quite challenging but here's the diagram of how I achieved it in the end:

You can see that 24V rail moves are a short segment to bottom layer. That's not a perfect solution but it's topologically impossible to route this PCB without at least one trace crossing. Likewise I decided that it'd be best for all generated rails to keep smallest impedance possible instead of increasing the resistance of a 24V rail.
Thermal considerations
12-WFDFN package of MAX IC is tiny. It's so small and yet at a maximum load it can generate over 1.5W of the heat. It simply cannot dissipate enough heat to air by itself and requires quite some help from PCB. As in most high power SMD packages there's exposed pad under IC meant for cooling. Like in all other ICs this pad is connected to the lowest possible potential inside the die. Usually this means GND and the heat can be conveniently sank to the ground plane via few vias under IC. Unfortunately in this case most negative voltage is output voltage, SOUT. This means we have to move heat to the bottom layer, distribute it there and move it back to the top to exchange heat with air.
It'd be the simplest if we could spread the heat on big copper pour on the back side and let it move slowly through FR4 to the top and to air. However, due to the poor thermal conductance of PCB (for 1.8mm PCB it's 1.4W/dm^2K) this methodology would require a big cutout in ground plane on the bottom layer, disturbing grounding performance.
That's exactly why I routed big -12V plane in the middle of the top layer. Now I can use the back side just as a "heat jumper" to move the heat from the bottom of IC to the plane nearby.
 |
| PCB design for "thermal jumper" |
Prototype
Taking all of this and many other factors together I designed and ordered boards. Due to the global shortage of absolutely anything I had to substitute many components (that's where huts and tents come from). I was most afraid of substituting LM50410 from 2.1Mhz variant to 700khz variant. I quickly recalculated some values, changed the inductor from 10uH to 22uH but left everything else intact. Surprisingly nothing burned and everything worked during the first try. MAX output waveforms looked terrible, ripple was much higher than expected but apart from that everything seemed perfect.
Precise heat tests
So I took one case, set it up in worst possible cooling configuration (all FR4 panels, no holes) and started doing temperature tests. With full 26.6W dissipated inside heat problems showed up quickly. Case got over 40C warmer inside than ambient which assuming people playing in summer with 30C air temperature would give 70C internal case temperature. That lead to the reduced temperature margin and cooling abilities for power electronics. Considering that in this design LMR50410 got 50C above ambient it'd overheat inside case.
Heating case up isn't trivial. Power resistors need to be mounted on something, somehow distributed in case to not melt plastic locally. After some tinkering I settled on using hood old incandescent light bulbs and using black case as heat generators. Light bulb releases just small fraction of the input power as a direct heat, most of it goes into IR radiation that got absorbed by case and released as the heat there.
Heat problem mitigations
I did math on how to cool down ICs better and realized that all solutions either increases cost by much or contained moving parts that could fail and generated noise. I could use SMD heat bridges to move heat to the plane on the top layer. I could use 4 layers and spread heat on inner layers to vent it further away. I could use multiple parallel converters. All of these solutions don't mitigate one main issue. Electrolytic capacitors' lifetime roughly halfs every 10C increase in temperature. 40C temperature increase, in such case, means capacitors have 16x shorter life.
I talked with case engineer and he promised me to change side panels for aluminum ones.


Comments
Post a Comment